

How To Make A Theme Background Tumblr
I saw that y'all had a tutorial on how to make or apply a custom background to a container theme, merely could y'all maybe practise a tutorial for the photoshop graphic part? I'd love to be able to create a pretty groundwork/edge to apply, but I'm not quite sure how to do information technology in a manner I'thou happy with.

okay nonny, get comfortable…
now bear in listen, that this tutorial will show you how to make a container theme background, and the techniques i use to brand mine - even so information technology may not be to your aesthetic gustation, just all y'all have to do is to replace the images i use with things you prefer…
this tutorial will help you with -
- checking the position and size of your container, checking the position/alignment of your groundwork.
- making a template.
- using guides in ps.
- designing a background - source images, brushes, stock resource etc.
- using clipping masks.
- using semi-transparent background on posts ( for readability ).
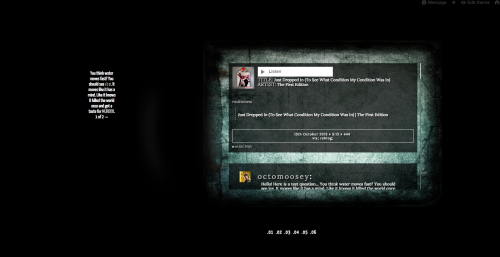
we'll be going from this -

to this -
using less than 10 layers in ps! (if yous want to run across the full preview of the finished background on a static theme, click here.)
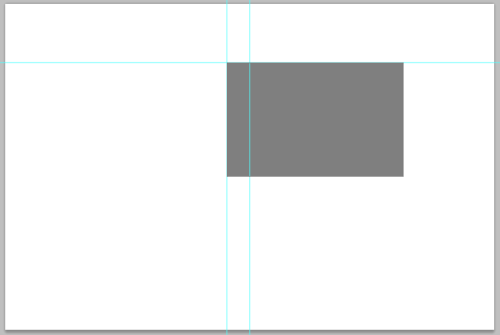
one. cheque the alignment!
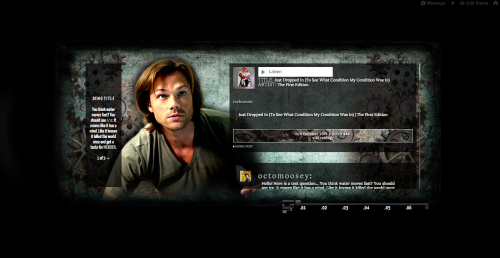
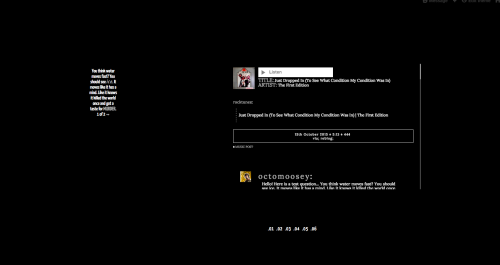
hither's a examination container theme…
in that location are 2 things yous'll need to know to make a template.
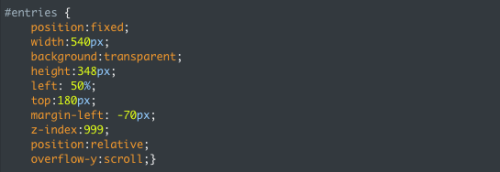
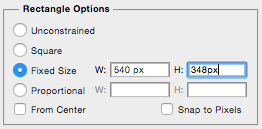
i. find out the size of your container from the code. it's usually entitled 'entries' or container, or content, or something similar. ( Annotation this is Not the post size, this is the container size! ). in this example my container is 540px broad, and 348px loftier. y'all might also want to make a note of how far it is from the left and the summit so that your template is positioned correctly. again, here it's 180px from the top, and the container is centered on the screen… ( more about that in a scrap! )
two. cheque the alignment of your background - it'll exist in the 'trunk' section of your css. you'll want to know whether this will line up with your container when the screen is resized. if it'southward non the same equally your container, you lot might need to change it.
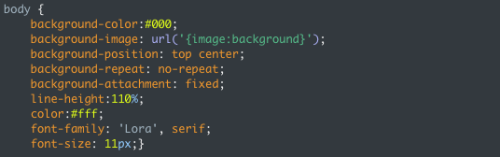
in this case my groundwork is aligned height centre, which ways it will ever line up with my container. if your container is aligned tiptop correct, brand sure your groundwork is the same!
2. brand a template!
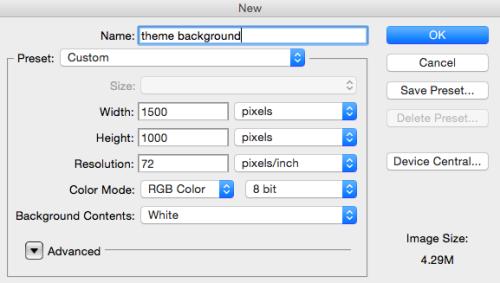
in photoshop, start with a large canvass - i usually get for something most 1500 broad by nigh chiliad alpine. click file > new, and then gear up your size;
now add some guides! this will really help!
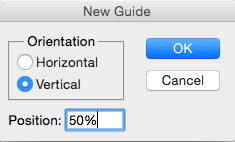
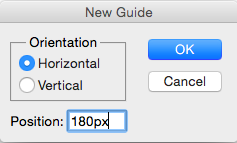
i'yard going to add a guide half way across so i have the center of my page and another one 180px from the top, so i know where the top of the container would be.
click view > new guide, brand sure the radio button is set to 'vertical' and then modify the text to fifty%
click view > new guide, change the radio push to horizontal and change the text to 180px.
now, in my theme my container is 'centered' just offset to the right a little and then i accept to summate the left hand edge of it. it volition exist half the width of my canvas minus the offset of the container. in the 'entries' code, i tin see the starting time is another -70px to the left. so, 1500/2-lxx=680. and so i'll brand another vertical guide 680px from the left.
NB/ if your container is aligned right or left and Non centered, you will simply need to create the guide to the left manus border of the container ( ordinarily the 'margin-left' value )

now i'll draw my box template - which should be the same size as my container. and then, 540px by 348px. you lot can describe an exact box by clicking on the 'rectangle shape tool'

and then look at the top of your screen to run into the contextual carte du jour -

click on the 'downwards' pointer next to the 'blobby shape', choose 'fixed shape' and type in the size of the rectangle you want to draw -
so just click on your sheet to create the shape and line information technology up with your guides…
this is your template! now you should check that everything lines up as it should by saving this as an image and uploading into your theme…
the grey box sits exactly behind the posts - phew!
NB/ E'er make certain to preview on your LIVE theme and not just the editing screen equally sometimes things may move in your live version. If whatever tweaks need to be made y'all want to exercise it at this indicate, non when your full theme background is complete! motility your container or your box on ps to make sure they fit together properly. also brand sure to resize your screen when your template is uploaded to brand sure the container doesn't 'slip' away from your posts!
3. the design.
y'all will want to make sure y'all take the images needed for your blueprint - maybe stock photos or ps brushes etc. here are a few places to get stock from;
- homeofthenutty or screencapped.net - for screencaps.
- deviantart - search past keyword and so click on the 'resources and stock images' department for useable images (make sure to 'favourite' the resources or link to them in your credits if required).
- tumblr tags for - textures, fonts, brushes, psds, etc.
the following is just an example of what you can practise…
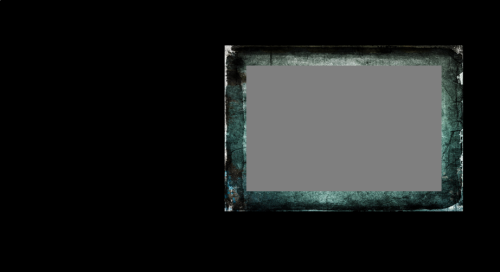
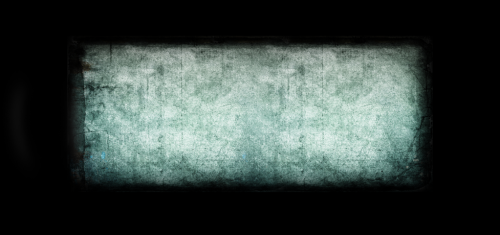
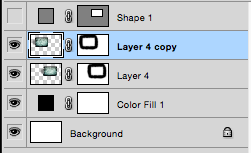
i've added in a 'grunge' groundwork to my container using the pre-fabricated edit by yko-54 from deviantart. and added a new make full layer ( blackness ) backside everything…
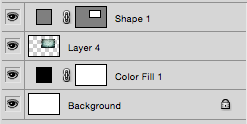
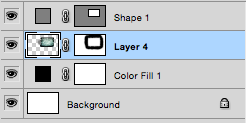
there are a few white corners that i demand to become rid of, so all i need to do here is add a layer mask to the grunge layer by selecting the layer and clicking on the 'layer mask icon' - the 3rd icon in the image below.

this will add together a white thumbnail to your layer - make sure this is highlighted and simply brush advisedly over the areas y'all don't desire with a big soft castor in black. if y'all make a mistake, just castor over that area over again using a white brush and information technology'll bring that part of the image back! you can see where y'all've brushed over on the thumbnail…

you tin test this on your theme - i'm just going to brand my grey template layer invisible ( by closing the eye next to the layer ) save, and upload it to my theme.
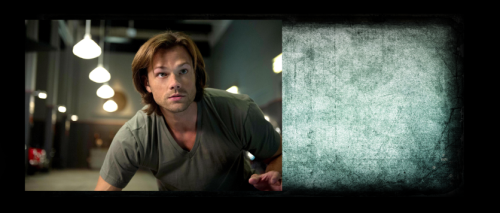
bully - merely my description looks a piffling odd over there on it's own. and then i'yard going to duplicate my grunge layer and move the duplicated layer over to the left…
and try it on my theme -
it took a lilliputian bit of tweaking of position to become it right, just moving left or right and uploading to make sure it was positioned correctly!
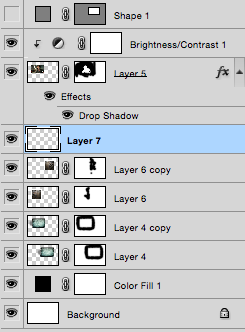
not a bad result for only 3 layers in a psd!
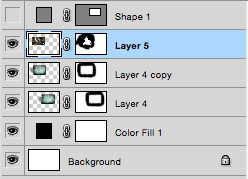
now i'yard going to add something into that blank space - so i've picked a screencap of my grapheme and dropped that onto the image -
again, i'k going to add together a layer mask and brush over the areas i don't want. in this example i might have to zoom in and use a smaller brush to get into the detailed parts, then resize and position the image;
and again, pop this into my theme to check the positioning;
at this signal you can continue adding layers, either more images, or adjustment layers, use psds, etc. to go something you're happy with…
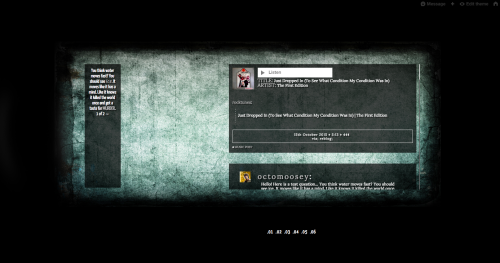
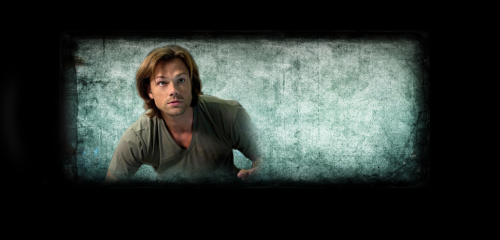
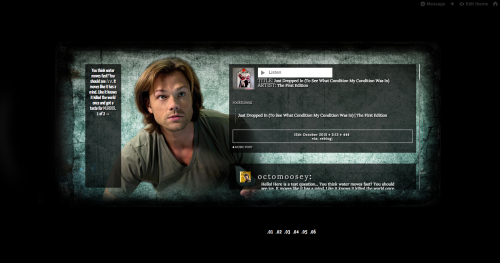
here i just added in a few more images to the background, gave sammy a brightness/contrast layer and added a drop shadow to make him stand out a little, and popped in a small border for my links…

and on the theme - with repositioned links -

the entire background still has less than 10 layers full, and didn't accept that much editing!
things to note - my posts and description already have a semi-transparent background so that i tin can withal run into my background simply it's not difficult to read my posts - if y'all desire to add one to your posts i would recommend using - this tool - which volition generate a transparent background for you -
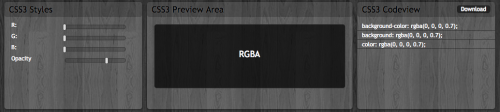
just move the sliders to get the colour and transparency you want, and copy the lawmaking from the right. make certain to copy the first 2 LINES ONLY! and paste this into your css section for posts.
if you desire to see the full preview on a static theme, click here.
but that'south about it really! i promise this helps nonny :3
if you found this useful, a like or a reblog is always appreciated… <3
- Show more than notesLoading...

How To Make A Theme Background Tumblr,
Source: https://octomoosey.tumblr.com/post/133656295652/i-saw-that-you-had-a-tutorial-on-how-to-make-or
Posted by: mccuskermente1947.blogspot.com
0 Response to "How To Make A Theme Background Tumblr"
Post a Comment